
I’ll be running a series of ‘Bloggers Masterclass’ posts with some helpful hints on making your blog work a little better, and to hopefully help you be a #betterblogger.
First up is getting a custom short URL for sharing your blog links. Most of you will know what a short URL is, you can quickly whack a long web address into goo.gl or bit.ly and it will generate you a smaller, Twitter friendly version of it. Both services also allow you to track how many people have clicked on the link too so you can see how your sharing is working for you.
A short url will normally look like this – http://bit.ly/1qSKoel – it’s still a bit generic and faceless, you could be sharing ANYTHING, but a custom short URL is a little more personal – mine are all “http://kiphak.es” which gives your followers a clearer idea that they are following a link from me. The great thing is, it’s REALLY easy to get yourself a custom short URL for sharing you blog links, or any links in fact, and on the whole it’s pretty cheap to set it up too! Just follow these simple steps, and you’ll have a custom short url in no time!

1 – Decide on a short URL.
This is possibly the hardest bit of the process, finding a domain name that is a)short and b)available. There is a helpful tool available called ‘DomainR‘ that will suggest short domain names, and show their availability. Remember a short domain name is classed as a domain that is 15 characters or less INCLUDING the dot (but excluding the http://). So – let’s find a short domain name for my new made up Blog – ‘Fab Dad Blog’ by entering the title in the search box like so..

So a selection of domain names appears – those with green dots are free to buy, the hollow green dots mean that they are soon available, and no dot means the domain is taken.
It’s a bit of a faff to find a decent name, something that is short, and ideally identifies your blog – I’d probably choose http://fabd.ad as it ticks the boxes. You can actually buy the domain name from DomainR straight off the bat, but I’d recommend shopping around. So long as your registrar offers DNS management with your domain it’s fine to use – my recommendation would be registering with Vidahost. You should also note that domains aren’t always cheap – the fabda.ad one I’ve chosen will cost a cool (or not!) £153 quid for two years! It’s not all bad news – the kiphak.es one I normally use is about £9 a year. You have to really shop around and balance out the cost and the value of the domain to you. Once you’ve picked and registered a domain, you need to do the next bit
2 – Configure your short URL.
To get your domain up and running, you need to ‘tie’ it to a domain shortening service. In this example – I’ll be using bit.ly – simply because it’s easy to configure and FREE!
If you don’t have one already – you need a bit.ly account – you can sign up here it takes a matter of minutes.
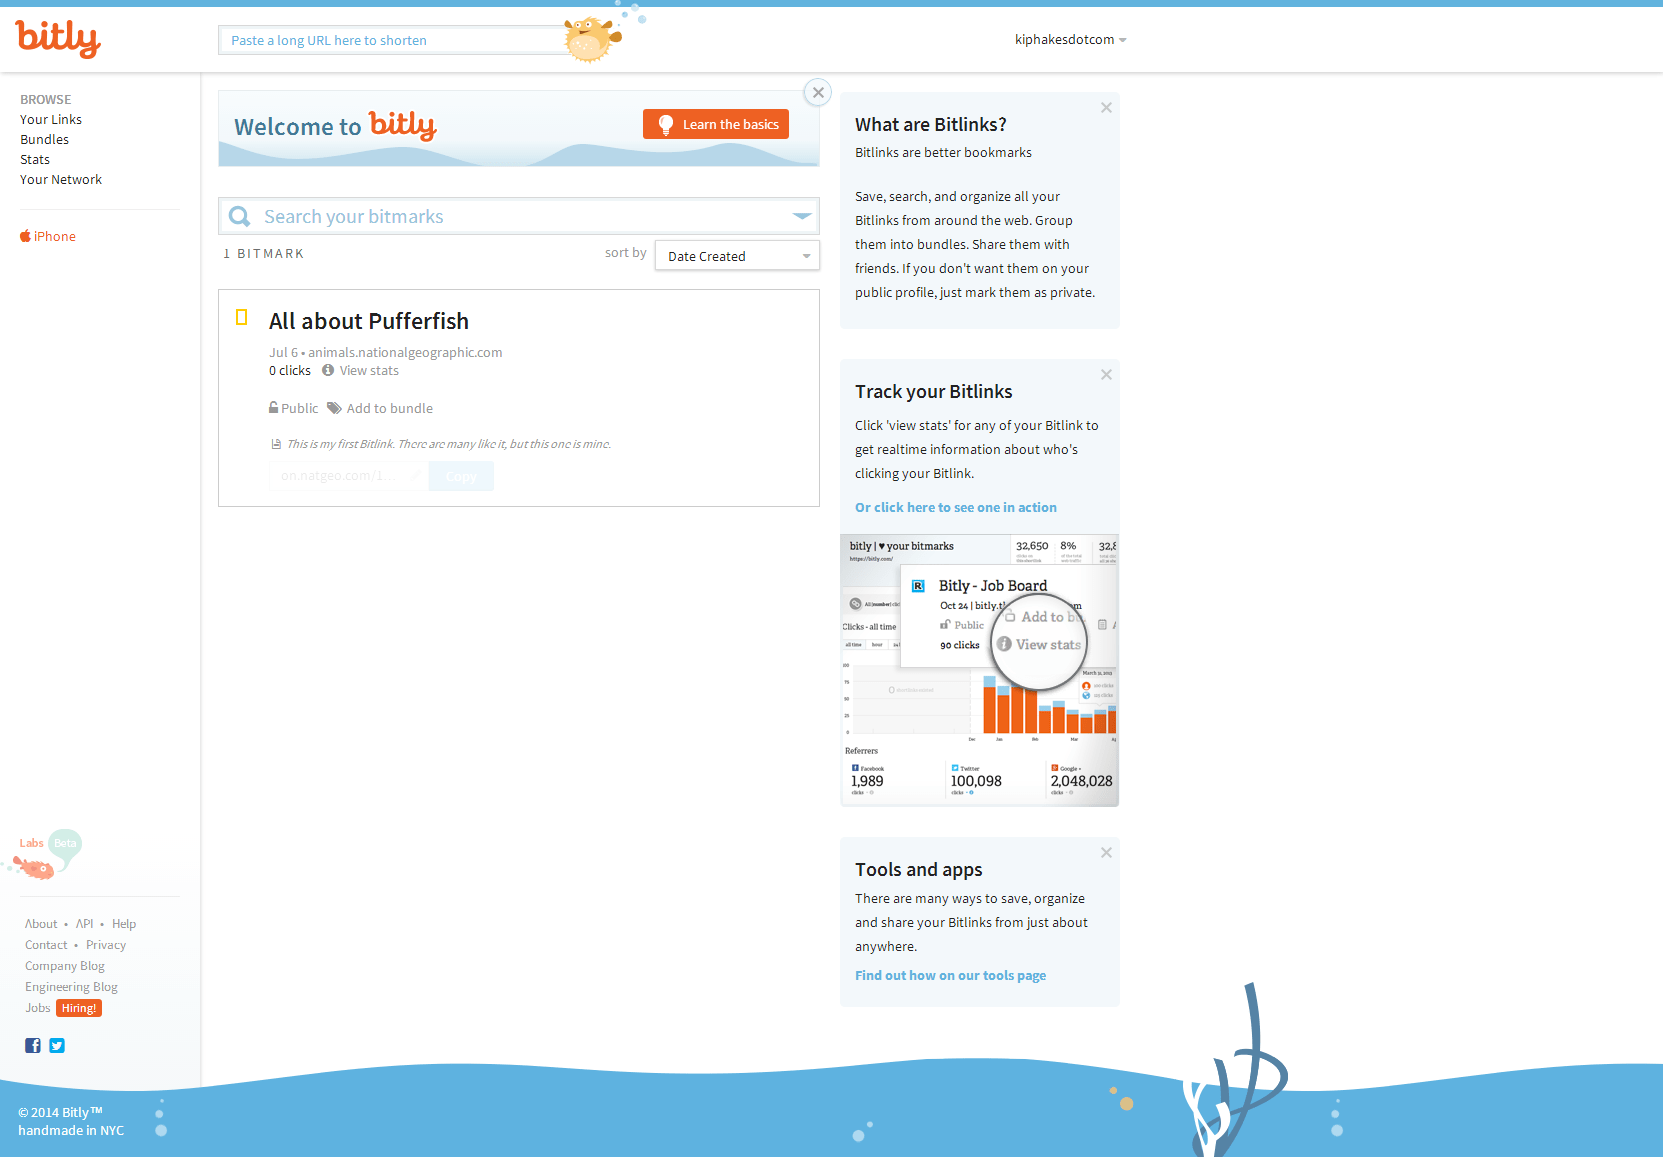
Once you’re logged in, you’ll see something like this.
If your account is new you’ll have to verify your email address by clicking on the link in the email – make sure you do this. Then, to configure your custom short URL to work with your bit.ly account, click on your username in the top right, and choose ‘Settings’, then click on the ‘Advanced’ tab. You’ll see this –

Under the ‘Branded Short Domain’ section click ‘Personal’ and you’ll be taken to a new page where you have to enter your custom short URL
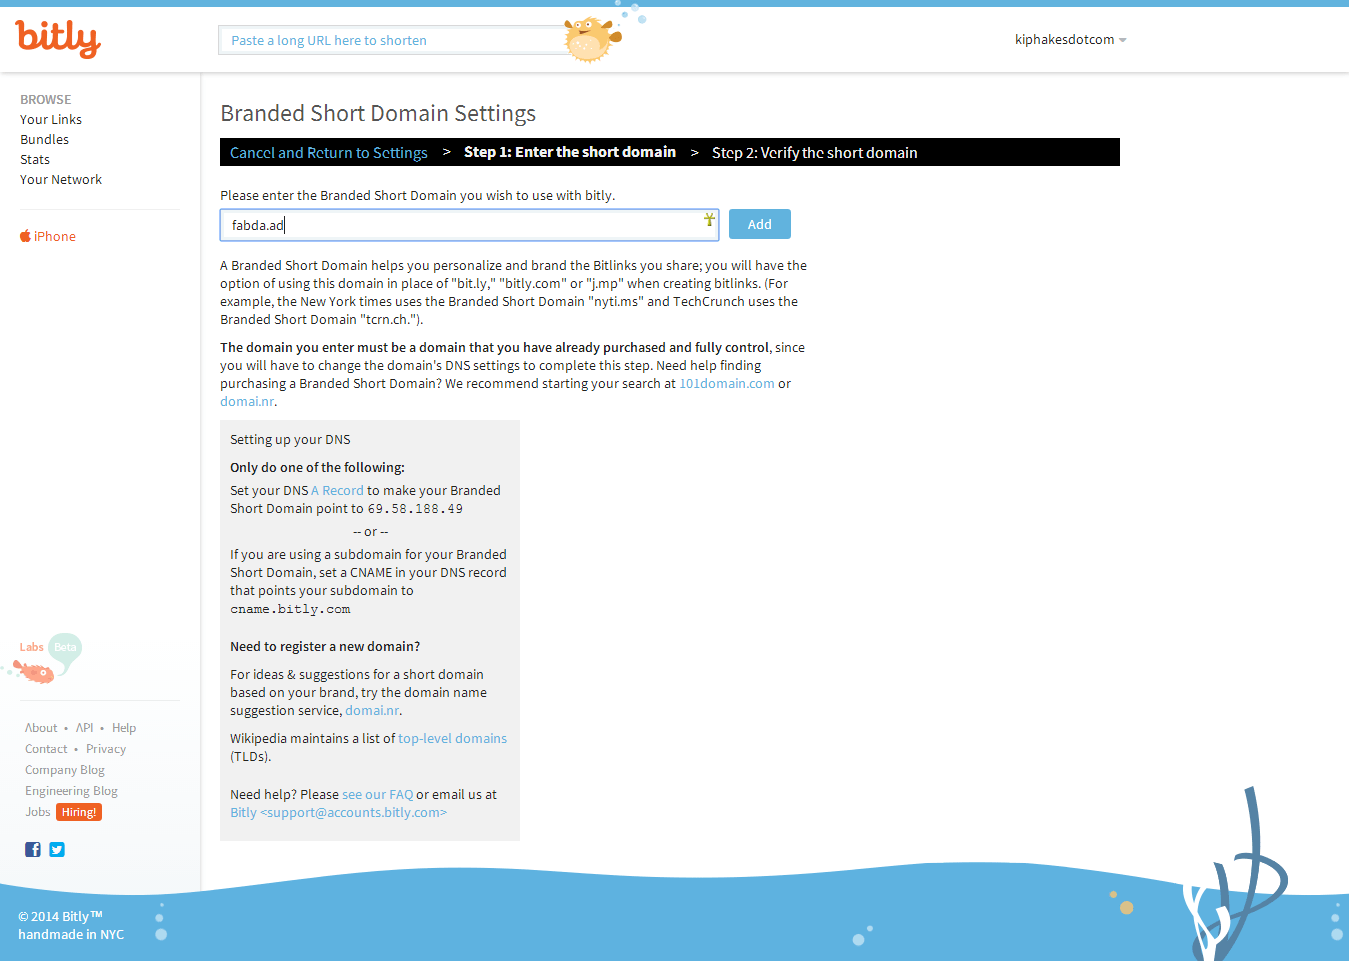
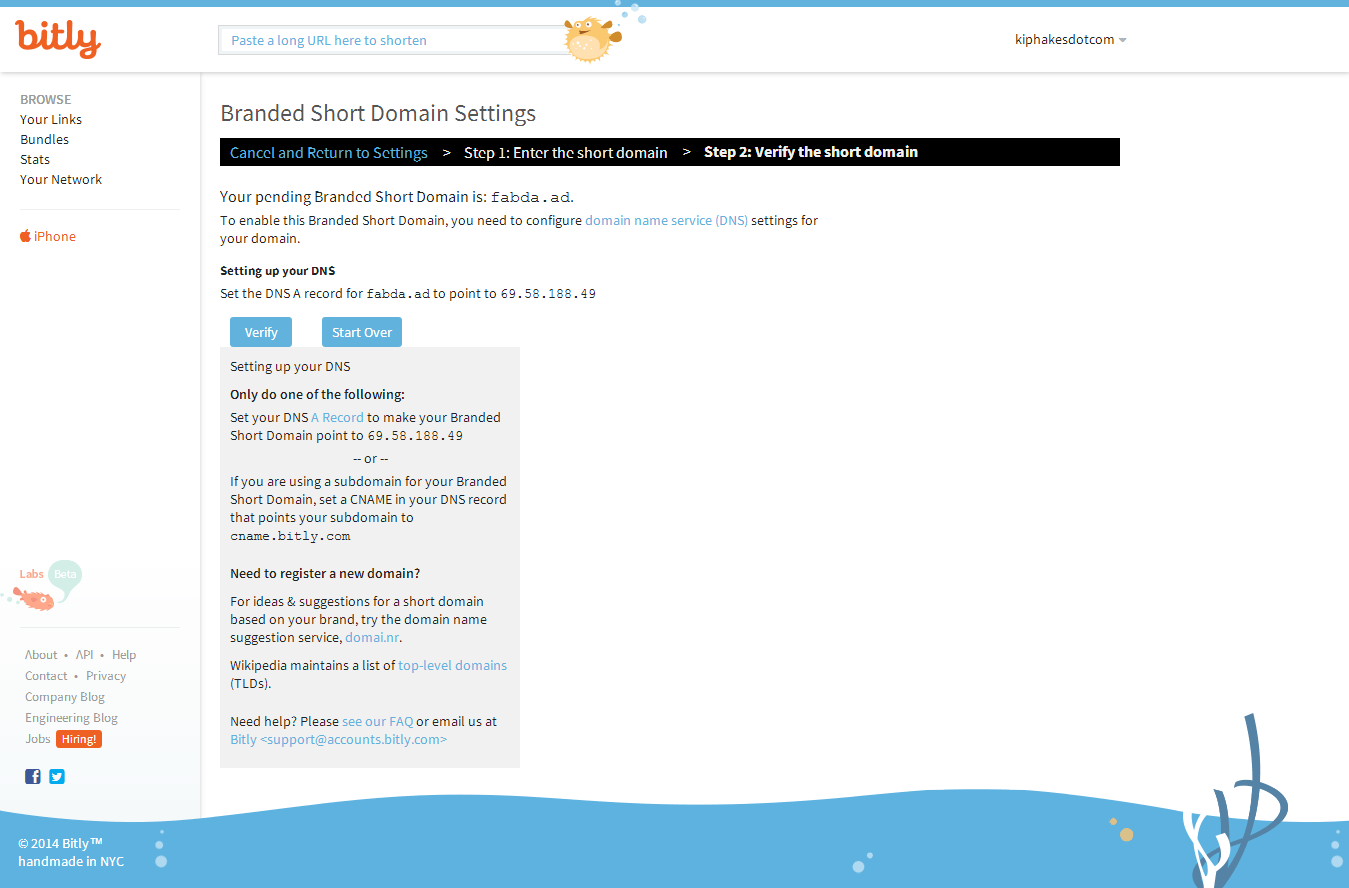
Once that’s done, it will tell you to set the ‘DNS A Record’ or your domain to a bit.ly IP Address, you do this with your hosting company’s control panel, if you’re not sure ask a friendly geek for help, or your hosting company. Once you’ve done this, go back to bit.ly ‘s Branded Short Domain Settings and click the ‘Verify’ button. Depending on your host, this will work immediately, or you might have to try after a few hours.
Once your domain is verified, you just need to make sure that it’s correctly set to be used as your default domain in bit.ly, and set the ‘Branded Short Domain Root Redirect’ too.
So go back into your bit.ly advanced settings (click on your account name in the top right, then Settings, then Advanced) and you need to make sure that the ‘Short Domain’ drop down is set to your short domain. Then, in the ‘Branded Short Domain Root Redirect’ put your full blog address in the box, this will make sure anyone who visits your short domain will head to your blog (and not bit.ly which is the default).

You’re all set now, and ready to move on to the next stage.
2 – Use your custom short URL.
There are a couple of ways you can use your short URL and share links with it. One of them is via bit.ly itself – once you’re logged in, just paste a long URL in the box at the top (next to the puffer fish) and it will instantly give you a short URL back.
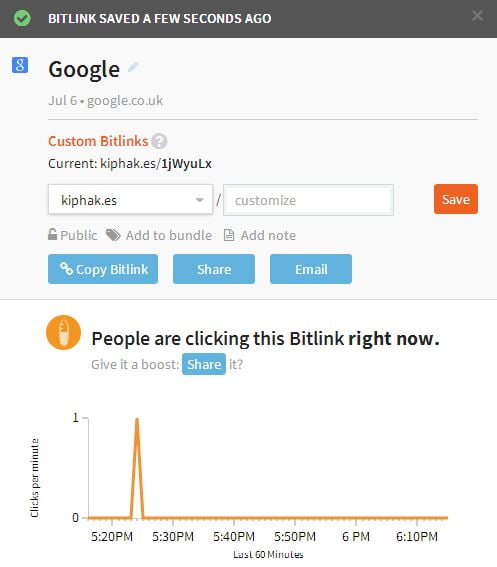
So it’s given me the short URL ‘http://kiphak.es/1jWyuLx’ – you can hit the ‘Copy BitLink’ button and this will be put straight in your clipboard, ready to pe pasted into a tweet, or put in a Facebook update etc. It will also allow you to ‘customise’ the link, so you can give it a friendlier title, so something like ‘kiphak.es/yourstuff’ – there is a small caveat in that you are limited to what you can put in here. If it’s already been used by someone else, tough, you something like ‘kiphak.es/yourfiles’ probably wouldn’t work, but ‘kiphak.es/kiphakesfile’ probably would. I just stick to the link bit.ly gives me.
From this window you can click ‘Share’ and share the link to your Facebook and Twitter.
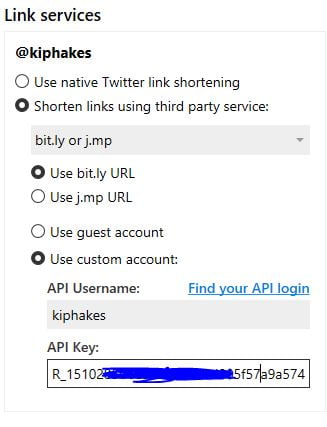
If you want to use your custom short URL automatically when you post on Twitter this can be done via the bit.ly API. Doing this is limited to 3rd Party Twitter Applications, you can’t set this up in the official Twitter App (boo!), but a lot of the 3rd Party Twitter apps will ‘play’ with bit.ly. Dive into the App’s settings and see if you can track down the configuration for bit.ly – it will probably have space for a username and API key (if you can’t find the settings in the App – Google it, or ask a geek). To find your username and password, log in to bit.ly and go into the ‘Advanced Settings’ (click on your account name in the top right, then Settings, then Advanced) – and scroll right down – your username and API key will be there. Put them into your app, and hopefully every link you post will be via bit.ly and using you custom short URL. Clever eh?
You can also integrate bit.ly into WordPress with this plugin, which will generate a custom short URL when you publish the post. It’s pretty easy to configure, but you need you OAUth token from bit.ly to use it – you can generate that here. If you use Jetpack ‘Publicize’ when that automatically posts, it’ll use your bit.ly link too!
There you go, my first Blogging Masterclass, hopefully you should be able to suss it all out, if not, drop me a comment!

great tips! will be using this!